


Spindle v2
The White Rabbit put on his spectacles. "Where shall
I begin, please your Majesty?" he asked.
"Begin at the beginning", the King said, very gravely,
"and go on till you come to the end: then stop."
— Lewis Carroll, "Alice's Adventures in Wonderland"
Notable scene productions that use Spindle:
- Shards of Fancy (2013) by lft
- Rocketry (2015) by Chorus
- Forever Lost (2015) by Samar Productions
- Aerial Core (2015) by Extend
- Nothing but PETSCII (2016) by Genesis Project
Introduction
Spindle is an integrated linking, loading and crunching solution for C64 trackmos. By hiding the details of the storage model, it allows the demo coder to focus on effects, transitions and flow.
The core of Spindle is a cutting-edge IRQ loader featuring extremely fast scattered loading and decrunching, state of the art serial transfer routines and GCR decoding on the fly. On top of this, Spindle provides an optional linking framework that automates much of the tedious work traditionally associated with trackmo development.
Download
- spindle-2.3 (Source tarball, 113.0 kB)
- spindle-2.3-win32 (Spin win32 binary + example, 74.7 kB)
- spindle-2.2 (Source tarball, 111.7 kB)
- spindle-2.2-win32 (Spin win32 binary + example, 73.7 kB)
- spindle-2.1 (Source tarball, 110.6 kB)
- spindle-2.1-win32 (Spin win32 binary + example, 73.2 kB)
- spindle-2.0 (Source tarball, 110.5 kB)
- spindle-2.0-win32 (Spin win32 binary + example, 72.4 kB)
2.0: Introducing Spin. Improved performance. Page $0f00 free for use.
2.1: (150708) Performance upgrade; better and faster decruncher.
2.2: (160427) Stability upgrade:
- Greater margins for serial transfer (optional, disable with -f).
- More robust checksum protection during motor spinup.
- Bus lock (write anything to all of dd02 in between loadercalls).
- Better ability to detect host reset (triggers a drive reset).
2.3: (160803) New features:
- Optional error injection to simulate realistic delays.
- The X tag is more forcing, i.e. prevents all unnecessary loading.
- The $c10 utility routine leaves the CPU I flag alone.
- Disk ID can be specified.

What's new in version two?
Starting with version two, Spindle offers a straightforward low-level API for scripted loading and decrunching. This mode of operation is supported by a new commandline tool, spin, that creates D64 files from simple scripts. Unlike traditional loaders, Spindle hides the details of the storage model, and does not rely on filenames at runtime; the loader call is parameterless. What to load (and transparently decrunch) in each call is specified at compile-time in the script.
The high-level API, organised around .pef files and the pefchain tool, is still available for users who prefer to automate more of the linking process. In this mode of operation, demo parts are compiled into self-describing bundles, stating what needs to be loaded before the part can run, and what pages are used by the part. Based on these constraints, Spindle creates a schedule of load and decrunch operations, and adds the required glue code to chain the parts together.
Both modes of operation now have full support for multi-side trackmos, with shortcuts to allow the demo to be restarted from any disk side.
The memory footprint has been reduced significantly, and the resident part of the loader fits snugly in two pages. A third page and a few zero-page locations are clobbered during load operations, but are otherwise free to use.
The built-in cruncher has been improved in terms of decrunch performance, crunch performance and compression ratio.
As before, Spindle comes in source code form. The new, simplified tool (spin) is also provided as a win32 binary. It has been tested with wine on Linux, and is expected to work equally well with alternative win32 implementations.
License
Go ahead and use this in your demos! You can include the spindle logo (example-pefchain/spindlelogo) if you like, but you don't have to. I would appreciate some credit, e.g. "Loader by lft".
Please refer to the file COPYING for the formal stuff.
Keeping it simple: Spin
Spin is a new and straightforward mode of operation introduced in version 2 of Spindle. With spin, the user has full control over the loading process, and specifies exactly what to load, and when. Nevertheless, with its unique scripted loading approach, Spindle takes away a significant part of the tedium of traditional trackmo linking.
The spin commandline tool can be built from source code; please refer to the section below on Requirements & building. A win32 executable is also provided.
The load script
At the heart of every spin-based trackmo is the load script. Spin parses the script at compile-time, reads and crunches all files that it refers to, and bakes everything into a disk image in D64 format. The idea is that the trackmo makes calls to the loader in a predetermined sequence. For each loader call, Spindle loads the data that was specified in the script at that point. Therefore, there is no need to pass any parameters to the loader call at runtime; all you need is "jsr $c90".
Let us have a look at a typical load script. It is taken from the complete spin example included in the Spindle distribution.
demo.prg
Specular_Highlight.sid          1000    7e

pic1.kla                        6000    2       1f40
pic1.kla                        4000    1f42    3e8
pic1.kla                        d800!   232a    3e8
pic1.kla                        d021!   2712    1

pic2.kla                        6000    2       1f40
pic2.kla                        4000    1f42    3e8
pic2.kla                        d800!   232a    3e8
pic2.kla                        d021!   2712    1

pic3.kla                        6000    2       1f40
pic3.kla                        4000    1f42    3e8
pic3.kla                        d800!   232a    3e8
pic3.kla                        d021!   2712    1
Blank lines are used to divide the script into paragraphs, where each paragraph corresponds to a single loader call.
Each paragraph describes a number of data chunks in a four-column format. The first column specifies a filename, which may optionally be enclosed in quotes ("). This is the only mandatory column. The second column specifies a loading address. If the loading address is zero or omitted, the first two bytes of the file are used. The third column specifies a byte offset within the file. Spin will seek to this offset before reading from the file (also before reading the load address, where applicable). The fourth column specifies the number of bytes to read. All values are in hexadecimal notation. An exclamation mark may optionally be given after the load address, to indicate that the data should be loaded into the I/O registers rather than shadow RAM.
In the example script, then, there are four paragraphs, corresponding to four loader calls. The first call is implicit, because it will be made automatically by the boot loader. This loads some code from demo.prg, to the address specified in the file. Additionally, it loads a SID tune to address $1000, starting at byte offset $7e in the file, i.e. right past the PSID header. The remaining paragraphs will be used to load three different pictures in Koala format.
After making the first loader call, the boot loader needs to know where to jump. You can specify this using the -e commandline switch to spin, or you can let it fall back on default behaviour, which is to take the load address from the first file in the first paragraph. In the example, demo.prg loads to address $0200, so the boot loader will jump to the code at that address.
However, before we look into demo.prg, we need to consider some practicalities.
Runtime concerns
Spindle occupies two pages of C64 memory at all times: $0c00–$0dff. This is known as the resident part of the loader. When you make a loader call, i.e. jsr $c90, the loader will also potentially overwrite memory in the range $0e00–$0eff and zero-page locations $f4–$f7.
When you are working with Spindle, VIC bank selection must be done using $dd02. Your code is not allowed to touch $dd00. Use the following constants to select VIC bank:
        $dd02   VIC bank
        -------------------
        $3c     $0000-$3fff
        $3d     $4000-$7fff
        $3e     $8000-$bfff
        $3f     $c000-$ffff
During initialisation, Spindle disables CIA interrupts, sets the interrupt-disable flag (sei) and writes $35 into the bank selection register at address 1. You should leave it at $35 when making loader calls. You may of course change it as you please from within your interrupt handlers, as long as you restore it afterwards.
Conversely, Spindle will only write $35 or $34 into the bank selection register, and it will only write $34 when loading into shadow RAM (in the I/O address range). Thus, you only need to save and restore this register from your interrupt routines if they will be triggered during a loader call that is targeting shadow RAM.
A humble trackmo
We will now take a look at the source code for demo.prg (listed below). This is a very small slideshow demo. First, it initialises the SID tune that was also loaded as part of the first, implicit, loader call. Then it sets up a raster IRQ to call the playroutine.
The example makes use of a utility routine in Spindle: Provide the LSB and MSB of a playroutine address in X and Y respectively, and call $c10. This will create a simple IRQ handler that executes from within the Spindle resident area. Of course, making use of this utility routine is completely optional, and you may install your own interrupt handlers in any way you like. The rationale for including this feature is that it allows you to replace all of C64 RAM (except the SID tune itself and the memory reserved by Spindle) during a loader call, without stopping the music. If you attempt this, remember that you cannot use jsr for the loader call if the currently executing code will be overwritten. Instead, you could manually push the entrypoint of the next demo part (minus 1) on the stack, and jmp into the loader. However, we don't need to resort to such trickery in the example, because the code remains at $200 throughout the demo.
After setting up the music player and selecting the proper graphics mode and VIC bank, the first explicit loader call is made. In accordance with the script above, this will load the first Koala picture. The bitmap, video matrix, colour RAM and background colour are loaded (and decrunched) to their respective locations. Note the exclamation marks for loading straight into colour RAM. This is not something you'd normally do, but for this example it makes sense to be able to see the scattered loading and decrunching in action. We use the same technique to load one byte into the background colour register, rather than writing it from within the demo code after the loader call returns. Admittedly, this is a bit silly.
The demo code then waits for space, loads the next picture, waits for space again, and loads the third and final picture. As part of the last loader call, Spindle will shut down and the 1541 will reset itself.
        .word   entry
        * = $200
entry
        ; Call music init.

        lda     #0
        jsr     $1000

        ; Set up raster interrupt.

        lda     #$3b
        sta     $d011
        lda     #$ff
        sta     $d012
        lda     #$01
        sta     $d01a
        lsr     $d019

        ; Install simple IRQ wrapper to call playroutine.
        ; Alternatively, we could use the $fffe vector normally.

        ldx     #<$1003
        ldy     #>$1003
        jsr     $c10
        cli             ; cli is needed starting with Spindle 2.3

        ; Switch banks so we can watch the loading process.

        lda     #$3d
        sta     $dd02
        lda     #$08
        sta     $d018
        lda     #$18
        sta     $d016
        lda     #$0
        sta     $d020

        ; Load the first picture.

        jsr     $c90

        ; Wait for space, then load the next picture, etc.

        jsr     wait4space
        jsr     $c90
        jsr     wait4space
        jsr     $c90

        ; All done. The drive has been reset as part of the
        ; final loader call.

        jmp     *

wait4space
        lda     #$ff
        sta     $dc02
        lsr
        sta     $dc00
        lda     #$10
        bit     $dc01
        beq     *-3
        bit     $dc01
        bne     *-3
        rts
Running spin
Armed with the above script, demo.prg and the three Koala pictures, we are ready to run the spin commandline tool. This can of course be done manually or automated with a build system (or even a simple batch file).
Since the example script makes use of relative filenames, we have to navigate to the directory that contains the files. Then it is a simple matter of:
spin script
This creates a disk image with the default output filename, "disk.d64". While Spindle uses its own D64-compatible storage format, it respects and coexists with the native commodore disk structure, so demo disks can be adorned with noters and other auxiliary files using standard tools like c1541.
You can use the -o option to change the output filename, and -t to choose a different title (label) for the disk. It is also possible to load directory art from a file with -a.
Normally, spin will run rather quietly, only reporting the number of free blocks remaining on the disk. But you may find it illuminating to enable verbose output by specifying the -v option one or more times. For the example above, -v provides the following summary:
At startup (with entry at $0200):
 * $0200-$0259 (a9 00 20 00 10 a9 3b 8d ...) from "demo.prg"
 * $1000-$35d6 (4c 10 14 a2 00 bd 00 19 ...) from "Specular_Highlight.sid"
Loader call #1:
 * $6000-$7f3f (55 55 55 55 55 55 55 55 ...) from "pic1.kla"
 * $4000-$43e7 (00 00 00 00 00 00 00 0b ...) from "pic1.kla"
 * $d800-$dbe7 (00 00 00 00 00 00 09 09 ...) from "pic1.kla"
 * $d021-$d021 (0a) from "pic1.kla"
Loader call #2:
 * $6000-$7f3f (fc 33 cc 33 cc 33 cf c3 ...) from "pic2.kla"
 * $4000-$43e7 (00 00 09 00 00 00 09 09 ...) from "pic2.kla"
 * $d800-$dbe7 (0b 0b 0b 0b 0b 0b 0b 0b ...) from "pic2.kla"
 * $d021-$d021 (0c) from "pic2.kla"
Loader call #3:
 * $6000-$7f3f (ea aa ea aa aa aa aa aa ...) from "pic3.kla"
 * $4000-$43e7 (07 0a 0a 0a 0a a2 00 0a ...) from "pic3.kla"
 * $d800-$dbe7 (0a 07 07 07 07 07 07 07 ...) from "pic3.kla"
 * $d021-$d021 (08) from "pic3.kla"
disk.d64: 554 blocks free.
Making multi-side trackmos with spin
Spindle version 2 supports multi-side trackmos. Each disk side is compiled separately. This helps with keeping down build times (as the entire disk side is crunched when building), and allows you to specify title and directory art for each side independently. But there is still a need to somehow associate the disk sides with each other at compile time, so the flip-disk routines can wait for the correct disk to be inserted, rather than blindly load whatever data that turns up. To this end, Spindle uses a system of magic numbers: For each disk side except the first, you have to specify a unique 24-bit number known as a knock code (as in: Knock knock, what's the password?). For each disk side except the last, you have to specify the correct knock code for the next disk side. You can generate knock codes using any random number generator. Please do that, rather than using mnemonic values that others might also pick.
For each disk side, you specify its own knock code using --my-magic, and the knock code of the next side using --next-magic. Here is an example, for a three-side demo:
spin -o side1.d64 --next-magic 0xc7189d script1
spin -o side2.d64 --my-magic 0xc7189d --next-magic 0x0f91e9 script2
spin -o side3.d64 --my-magic 0x0f91e9 script3
When you specify the --next-magic option, spin adds two invisible loader calls to the end of the script. The first of these extra loader calls will block until the next disk side has been inserted, and then return. This allows you to stop displaying "flip disk" on the screen as soon as the correct disk has been detected. The second extra loader call corresponds to the first, implicit, loader call of the next disk. So when this call returns, you'll be in a position to jump into the newly loaded code, and continue the demo on the new side.
Note that each disk side will have its own entrypoint, by default the load address of the first file mentioned in the script. In this way, it is possible to restart the trackmo from any disk side. It also allows you to work on each disk side separately when developing and syncing the demo. But when you are transitioning from one side to the next, the code on the current side explicitly has to jump into the code on the next side. This gives you the freedom to jump to a different address, and thus to treat the transition from side 1 to side 2 differently from the case where the user boots directly from side 2.
This concludes the presentation of spin, the low-level interface to Spindle.
Automated linking with pefchain
Spin may simplify some aspects of demo linking, but the full power of Spindle will not become evident until you start to use pefchain.
With pefchain, independently developed demo parts can be chained together easily, in any order, facilitating exploration of the design space in order to arrive at a rough cut. The tool assists the coder by suggesting where and how filler parts could be crafted to improve the loading process. A visualisation of block demand and memory usage over time provides further optimisation hints.
The following text is to a large extent identical to the documentation provided with version 1 of Spindle. The section on multi-side trackmos is new, and the interested reader may wish to check what's new under the hood.
Requirements & building
Spindle is designed for Linux, but it should be fairly portable.
To build Spindle, you need gcc, GNU make and xa (the latter is found in the xa65 debian package). Copy the spindle subdirectory to where you keep the source code for your upcoming trackmo, enter it and type:
make
This should produce three executable files: mkpef, pef2prg and pefchain. There is no "make install", because I recommend that you keep a local copy of Spindle close to each demo. The details (and timing) of Spindle may change across versions, and it's a good idea to be able to re-build a demo long after its release, and obtain exactly the same disk image.
Demo parts can be developed using any tools you like, but some kind of make system is recommended.
General structure
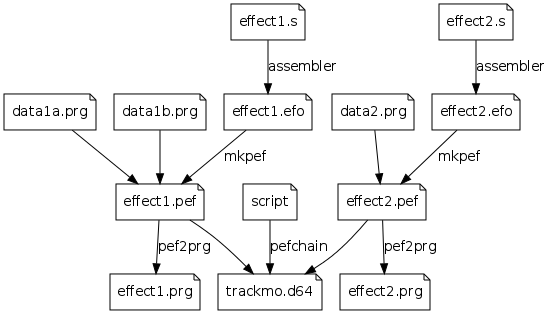
The basic building block of a Spindle trackmo is the individual demo part. A part is handled as a single file with the extension .pef (packaged effect). The mkpef tool is used to bundle any number of data chunks, with different target addresses in C64 RAM, into such a file.
The first chunk, which typically contains all the code for the part, must start with a special header. Such a file is called an effect object (filename extension .efo), but it's just a regular binary file produced by your favourite assembler. All you have to do is place some constant declarations at the top of the file, with information for the linking system and pointers to a few routines, as detailed below.
During part development (and in the case of a one-file demo), you can use pef2prg to convert a .pef file into a C64 executable file that runs the part.
Another tool, pefchain, links together several parts according to a script, and produces a complete trackmo in the form of a D64 image. In the script file, you get to specify a transition condition for each part, typically space during early development (wait for the user to press space). Later on, these conditions are changed into waiting for a memory address to contain a given value (for synchronising with music).
For more information about the individual Spindle tools, please run them with the --help (or -h) option, and study the makefiles in the example directories.
Parts
An .efo file starts with the following fixed-size header (with no loading address before it):
        .byt    "EFO2"          ; fileformat magic
        .word   prepare         ; prepare routine
        .word   setup           ; setup routine
        .word   interrupt       ; irq handler
        .word   main            ; main routine
        .word   fadeout         ; fadeout routine
        .word   cleanup         ; cleanup routine
        .word   callmusic       ; location of playroutine call
The fixed-size header is followed by a variable-size list of options. An option consists of a single tag byte followed by 0-2 parameter bytes (depending on the tag).
Options affect pefchain, but not pef2prg, so you don't need to bother with them while developing a new effect. The valid tags are:
|
.byt "P",FIRST,LAST |
Declares that this demo part uses the range of memory pages from FIRST up to and including LAST. There is no need to declare memory pages that are loaded, i.e. are in the loading range of one of the chunks that make up a packaged effect. But if you generate code or tables at runtime, you have to declare that memory. You can use this option multiple times. |
|
.byt "I",FIRST,LAST |
Declares that this demo part inherits the contents of the range of memory pages from FIRST up to and including LAST from the previous part. Normally, you don't need to use this option. But it comes in handy when you start coding transitions between parts, such as when you load a bitmap as part of a preliminary fade-in part, and then wish to re-use that same bitmap in the actual part. You can use this option multiple times. |
|
.byt "Z",FIRST,LAST |
Declares that this demo part uses zero-page locations from FIRST up to and including LAST. It is often convenient to keep all zero-page locations used by an effect close together, and declare a slightly larger range. You can use this option multiple times. |
|
.byt "S" |
"Safe I/O". Declares that any interrupt handlers used in this demo part are able to coexist with loading operations that access shadow RAM at $d000–$dfff. In practice, such interrupt handlers should back up the value at $01, store $35 into $01, handle and acknowledge the interrupt, and finally restore the previous value at $01. |
|
.byt "U" |
"Unsafe I/O". Declares that this part may switch out the I/O registers in main context, i.e. during prepare or main. If this part follows a part that lacks the S tag, Spindle will make sure to insert a blank part between the two. |
|
.byt "X" |
Declares that loading should be avoided during this demo part. Normally, if a part lacks a main routine, Spindle will assume that this is a good place to do some loading. Sometimes you'll want to prevent that, in particular when a main-less part nevertheless uses a lot of rastertime. |
|
.byt "M",LSB,MSB |
Declares that this demo part installs a music player with a given playroutine address. This option will be described in detail later in the document. |
|
.byt 0 |
Marks the end of the tag list. |
Following the final tag byte (null) is the loading address of the rest of the file, which normally contains the code for the demo part. The vectors in the fixed-size header typically point to routines inside this area.
Runtime concerns
Spindle occupies two pages of C64 memory at all times: $0c00–$0dff. This is known as the resident part of the loader.
During loading, Spindle will also potentially overwrite memory in the range $0e00–$0eff and zero-page locations $f4–$f7. Since pefchain may schedule a load at any time during your part, be extra careful if you wish to use these memory areas.
When you are working with Spindle, VIC bank selection must be done using $dd02. Your code is not allowed to touch $dd00. Use the following constants to select VIC bank:
        $dd02   VIC bank
        -------------------
        $3c     $0000-$3fff
        $3d     $4000-$7fff
        $3e     $8000-$bfff
        $3f     $c000-$ffff
During initialisation, Spindle disables CIA interrupts, enables raster interrupts, sets the interrupt-disable flag (sei) and writes $35 into the bank selection register at address 1. You are allowed to change this to $34 and back again during routines that execute in main context (e.g. prepare), but only if you declare this fact using the U tag. You may of course change it as you please from within your interrupt handlers, as long as you restore it afterwards.
Conversely, Spindle will only write $35 or $34 into the bank selection register, and it will only write $34 during parts marked with the S tag.
Furthermore, as a convenience for the demo coder, Spindle sets up timer B of CIA #1 to count down repeatedly with a 63-cycle period, synchronised with the raster position. The choice of timer (and the fact that the Spindle runtime stays out of pages 1–8) is compatible with distributed jitter correction of NMIs, and the phase of the countdown period allows for delay-based jitter correction of raster interrupts using the following code snippet, which also appears in template/effect.s:
interrupt
        ; Jitter correction. Put earliest cycle in parenthesis.
        ; (10 with no sprites, 19 with all sprites, ...)
        ; Length of clockslide can be increased if more jitter
        ; is expected, e.g. due to NMIs.
        dec     0               ; 10..18
        sta     int_savea+1     ; 15..23
        lda     #39-(10)        ; 19..27 <- (earliest cycle)
        sec                     ; 21..29
        sbc     $dc06           ; 23..31, A becomes 0..8
        sta     *+4             ; 27..35
        bpl     *+2             ; 31..39
        lda     #$a9            ; 34
        lda     #$a9            ; 36
        lda     #$a9            ; 38
        lda     $eaa5           ; 40

        ; at cycle 34+(10) = 44
Incidentally, this code uses a trick to avoid having to save the bank register at address 1: By decrementing the data direction register at address 0, the effective bank selection will be $35 regardless of whether $35 or $34 is stored in the bank register. This is because an I/O line configured as an input will be pulled high. At the end of the interrupt handler, the data direction register is incremented again.
The number in parenthesis (10 in the template code) indicates the earliest possible cycle on which the interrupt routine might start executing. Thus, if you enable sprite DMA, you will have to increase this number accordingly.
Note that the jitter compensation scheme has changed with respect to Spindle version 1. You must either convert your old parts, or patch Spindle v2 to use the old setup code (in spindle/commonsetup.s).
Starting with version 2 of Spindle, pefchain will tack on a driver at the end of each effect. The driver is typically very small, and is responsible for making calls to the various routines in the current and next effect, and checking the transition condition. Specifically, these bytes are appended to the first chunk (the one with the EFO header), so make sure that you do not write past the end of your code.
Lifecycle
This is the lifecycle of a demo part, regarded in isolation:
----- Preparations -----------------------------------------
1. Load any remaining sectors
2. Call prepare
----- Switchover -------------------------------------------
3. Disable interrupts
4. Store the address of the interrupt routine at $fffe-$ffff
5. Call setup
6. Enable interrupts
----- Running ----------------------------------------------
7. Repeatedly call main until some condition (e.g. space)
8. Repeatedly call main until fadeout sets carry
----- Aftermath --------------------------------------------
9. Call cleanup
All of the routines are optional: Supply a null pointer to make Spindle ignore a particular vector. Most new effects start out with just prepare, setup and interrupt.
The prepare routine is responsible for the bulk of the initialisation. This is where you generate speedcode and tables, make copies of graphics data across multiple banks and so on. You should not write to any VIC registers in prepare.
The job of the setup routine is to initialise the VIC registers (including colour RAM) just before the effect starts. This routine executes with interrupts disabled, and should be fast. Don't forget to initialise $d011, $d012, $d015, $d016, $d018 and $dd02. Your part may follow some other part that leaves unexpected values in these registers.
The interrupt routine obviously executes in interrupt context; this pointer is written directly to the vector at $fffe. Of course you can modify $fffe as part of your effect; Spindle only writes this vector at step 4 in order to minimise the amount of boilerplate code needed to get a new demo part up and running.
The main routine is intended for so called newskool effects that fill a framebuffer as fast as possible but don't achieve full frame rate. Try to avoid using a main routine whenever you can; more about this later.
The fadeout routine typically does two things: It triggers a fadeout operation, usually by setting a global flag that affects the behaviour of the running effect. It also monitors the fadeout in progress, returning with carry set if the fadeout has completed. Mnemonic: "Carry on" with the next effect. If the demo part is main-less, fadeout is simply called repeatedly in a tight loop. Otherwise, Spindle alternately calls main and fadeout.
Finally, the cleanup routine can be used to tear down the demo part in a controlled fashion. It is called while interrupts are still enabled, but you can put a sei instruction inside cleanup if this is desirable. You could, for instance, install a non-maskable timer interrupt in setup and disable it in cleanup. Or you could use cleanup to wait for a particular rasterline before moving on to the next demo part.
When several demo parts are linked together, their lifecycles overlap. Specifically, the call to prepare is made while the interrupt handler of the previous part is still active. This clearly won't work if the memory ranges occupied by adjacent parts overlap, and that is one of the reasons for having to declare the memory usage of each part. If two adjacent parts would collide in memory, pefchain inserts a blank part between them (and prints a warning about it). The blank part consists of a completely black screen with no badlines, along with an interrupt handler that merely calls the current music player.
Loading is performed while the parts are running. Spindle prefers to load during parts that lack a main routine, but if necessary, it can also schedule some loading operations after fadeout returns with carry set, before the call to cleanup. In dire circumstances, Spindle may be forced to insert a blank part in order to do some loading (e.g. into shadow RAM), in which case it will also print a warning.
The following illustrates the switchover from one (main-less) demo part to another:
----- Preparations ------------------
1. Load any remaining sectors
   (and also load as much as possible
   in preparation for later parts)
2. Call prepare
----- Switchover --------------------
3. Disable interrupts
4. Install interrupt vector
5. Call setup
6. Enable interrupts
----- Running -----------------------   ----- Preparations ------------------
                                        1. Load any remaining sectors
                                           (and also load as much as possible
                                           in preparation for later parts)
                                        2. Call prepare
7. Wait for condition (e.g. space)
8. Call fadeout until it sets carry
----- Aftermath ---------------------   ----- Switchover --------------------
9. Call cleanup
                                        3. Disable interrupts
                                        4. Install interrupt vector
                                        5. Call setup
                                        6. Enable interrupts
                                        ----- Running -----------------------
                                        7. Call main until condition
                                        8. Call main until fadeout sets carry
                                        ----- Aftermath ---------------------
                                        9. Call cleanup
When switching from a demo part with a main routine, the items in the simultaneous Running and Preparations phases are performed in a different order. In this case, Spindle starts with steps 7 and 8 of the first part, and then moves on to steps 1 and 2 of the second, and it tries to minimise rather than maximise the amount of loading.
Making a chain
The script file controls how all the parts fit together to make a trackmo. Here's an example:
# This is an example script bundled with Spindle
# http://www.linusakesson.net/software/spindle/

spindlelogo/spindlelogo.pef     -
music/music.pef                 -
ecmplasma/ecmplasma.pef         ed = 0b
lft/lft.pef                     space
-                               -
This trackmo consists of five parts. The first four parts are supplied as .pef files (paths are relative to the current directory when pefchain is invoked), and the fifth is the internal blank part, which is simply a black screen and an interrupt handler that calls the music player.
In the second column are transition conditions. These tell Spindle when it is time to advance from step 7 to step 8 in the effect lifecycle. There are three kinds of conditions: "space" means wait for space to be pressed, "-" means drop through to the fadeout stage (after any scheduled loading has completed), and "address = value" means to wait until the given address contains the given value. In the example, I rely on the fact that my music playroutine stores the current song position at zero-page location $ed.
The condition of the last part of a script is ignored; that part executes indefinitely.
Music
A demo part may install a music player. Such a part would make a call from setup to the init routine of the tune, and also declare the address of the playroutine using the M tag. Please have a look at example-pefchain/music/install.s for a minimal example.
The interrupt handlers of subsequent effects should be fitted with a dummy three-byte instruction (e.g. bit !0), and the address of this instruction should be given in the last field of the .efo header. At link time (not runtime), Spindle will replace the dummy instruction with a jsr to the currently installed playroutine. This makes it very easy to move parts around in a trackmo with multiple tunes, and to move tunes around in memory. The dummy instruction remains if the part is scheduled to run even though no music player has been installed, such as when the part is launched with pef2prg.
Only one music player may be active at a time, so installing a second player replaces the first one. To uninstall the current music player, use the M tag with a null parameter.
Spindle assumes that any data chunk in a music-installing .pef file, apart from the first (the one with the .efo header), represents a global allocation of memory that should remain reserved until the music player is uninstalled or replaced. Subsequent parts implicitly inherit the contents of those memory pages. This is normally what you want, but it may prevent you from installing a music player as a side-effect in a demo part that also does something visually. Please let me know if this is a problem.
For clarity, the music-installing demo part should have a null callmusic field.
Visualisation
Apart from producing the D64 image, pefchain prints a chart detailing the memory usage of every part. This is what it looks like for the example trackmo:
0   1   2   3   4   5   6   7   8   9   a   b   c   d   e   f
.|.r....................................***.....................  (loader stage 2)
.|.r******..............................ccc................*....  spindlelogo.pef
...rLLLLLL***...***.***.*******.*******.|||****.*******.***c***.  music.pef
...r||||||..LUU....................c....***....................U  ecmplasma.pef
...r||||||cc...ULLL.LLL.LLLLLLLULLL.LLL.LLLLLLLULLLLLLLULLL.LLL.  lft.pef
...c||||||......................................................  (blank)
demo.d64: 563 blocks free.
By default, every column in the chart corresponds to four pages of RAM, but the -w option can be given once or twice to increase the granularity. Here is a legend for the characters:
r  This memory is reserved for the Spindle runtime system.
.  This memory is not used by the part.
L  This memory is loaded from disk.
c  This memory is loaded from disk as part of the .efo chunk ("code").
U  This memory is used by the part (but not loaded).
|  This memory is inherited from the previous part.
*  This memory is being loaded now in preparation for a later part.
As a general rule, Spindle tries to load everthing as early as possible. This behaviour is often what you want, and if not, it is very easy to modify by adding false page-used declarations (P tags) to parts. Furthermore, the X tag can be used to minimise the loading that takes place during a part. This has been done for spindlelogo.pef in the example, because it is more interesting for the audience if the bulk of the loading occurs after the music has started.
In the example, the blocks loaded during spindlelogo.pef correspond to the LLLLLL and c segments of music.pef. After music.pef has been launched, Spindle loads a large number of blocks comprising the L and c of ecmplasma.pef and most of the L segments of lft.pef. However, it cannot load into the memory range already occupied by the ccc of spindlelogo.pef, because this memory is still in use: Since the video matrix and font of spindlelogo.pef remain visible during music.pef, the corresponding memory pages have been declared as inherited (with the I tag) in music.pef. Once ecmplasma.pef is up and running, Spindle loads and decrunches the remaining data into this area.
As you can see, the code and data of ecmplasma.pef fits perfectly into gaps left by lft.pef. This is no coincidence: The first time you run pefchain, most parts will interfere with each other, and Spindle will be forced to insert blank parts between them. But if it is at all possible to alleviate the situation by moving things around in memory, a quick glance at the chart will often be enough to see how it should be done.
Whenever Spindle is forced to insert a blank part for some reason, it prints a warning. Where applicable, it will also suggest how to address the problem. For instance, if we switch the order of ecmplasma.pef and lft.pef, we get the following output:
Warning: Inserting blank filler because 'music.pef' and 'lft.pef' share pages a0-a8.
Suggestion: Move things around or insert a part that only touches pages 02-0b,0f,
25-27,2e-3d,4b-4f,5c-5f,79-7b,8b-8f,9c-9f,b9-bb,d9-db,ed-ef,fb-ff and zero-page
locations 02,12-f3,f7-ff.
0   1   2   3   4   5   6   7   8   9   a   b   c   d   e   f
.|.r....................................***.....................     (loader stage 2)
.|.r******..............................ccc................*....     spindlelogo.pef
...rLLLLLL***...***.***.*******.*******.|||****.*******.***c***.     music.pef
...r||||||..............................***.....................     (blank)
...r||||||cc...ULLL.LLL.LLLLLLLULLL.LLL.LLLLLLLULLLLLLLULLL.LLL.     lft.pef
...r||||||..LUU....................c...........................U     ecmplasma.pef
...c||||||......................................................     (blank)
demo.d64: 563 blocks free.
Depending on the demo, the brief black intermission might not be a problem. Another way of addressing the problem, as is visually clear from the chart, would be to relocate all of spindlelogo.pef to $3400 (and adjust the inheritance declarations in music.pef). But a third option is to follow the suggestion and add a filler part that doesn't interfere with the memory of its neighbours. Spindle lists all memory pages and zero-page locations that are free. Be aware, however, that Spindle currently doesn't track zero-page addresses used by the music player, so you have to take care of that yourself. For instance, my playroutine uses zero-page locations from $e0 up, so I just make sure to stay below that for effect code.
Making multi-side trackmos with pefchain
Spindle version 2 supports multi-side trackmos. Each disk side is compiled separately. This helps with keeping down build times (as the entire disk side is crunched when building), and allows you to specify title and directory art for each side independently. But there is still a need to somehow associate the disk sides with each other at compile time, so the flip-disk routines can wait for the correct disk to be inserted, rather than blindly load whatever data that turns up. To this end, Spindle uses a system of magic numbers: For each disk side except the first, you have to specify a unique 24-bit number known as a knock code (as in: Knock knock, what's the password?). For each disk side except the last, you have to specify the correct knock code of the next disk side. You can generate knock codes using any random number generator. Please do that, rather than using mnemonic values that others might also pick.
For each disk side, you specify its own knock code using --my-magic, and the knock code of the next side using --next-magic. Here is an example, for a three-side demo:
pefchain -o side1.d64 --next-magic 0xc7189d script1
pefchain -o side2.d64 --my-magic 0xc7189d --next-magic 0x0f91e9 script2
pefchain -o side3.d64 --my-magic 0x0f91e9 script3
When you specify the --next-magic option, pefchain treats the last effect in the script specially. This will be referred to as the flip-disk part. It will not be allowed to have a main routine, and its transition condition will be the fact that the next disk side has been detected.
In other words, the flip-disk part will be initialised normally, by calling prepare and setup and installing the interrupt handler. It will remain in effect until the new disk side is detected. Then, the fadeout routine will be called in a loop until it returns with the carry flag set. When this happens, Spindle will load the first part of the next disk side, while the flip-disk part remains active. Once the loading has completed, the cleanup routine of the flip-disk part is called.
You could thus use the first fadeout call to trigger some interrupt-driven animation that removes "flip disk" from the screen, and then keep carry clear until the animation completes in order to prevent a premature transition to the first effect on the next disk side. But you may wish to keep interesting things on the screen until the call to cleanup comes; in it, trigger some interrupt-driven animation to really fade out the effect, and busywait in the cleanup routine until this animation has completed.
Keep in mind that the flip-disk part mustn't use the same memory as the first effect on the next disk side. Normally, pefchain would assist you in detecting such collisions, but it cannot help you here since disk sides are compiled separately.
Finally, it may be useful to be able to detect whether the first part on a disk side was launched due to a transition from the previous disk side, or directly from the regular boot loader (e.g. starting in the middle of the trackmo). Before calling the prepare and setup routines of the first effect on a disk side, Spindle will set the carry flag if there was a transition from the previous disk side (we've "carried over"); otherwise it will clear the carry flag. Consequently, the prepare and setup routines of the first effect on the first disk side may rely on carry being clear. For effects later on in the scripts, the state of the carry flag is undefined.
Methodology
The following is merely a suggestion on how to work with Spindle. It is included partly as helpful advice, partly because it may shine a light some of the design decisions I made for the system.
First, create some demo parts. Start with the template, or add an .efo header to your existing code. In this early phase, you'll probably only need the fields prepare, setup, interrupt and possibly main depending on the effect. Use pef2prg during development. Keep each demo part inside its own subdirectory of your main project directory for the demo, and give each part a short working name. The name of the .pef file should be based on this name, rather than something non-descriptive like effect.pef. As the part evolves from an experimental hack to an enjoyable demo effect, you should at some point declare what memory pages and zero-page locations it uses, before you forget all about it.
Once you have the parts, put them into a script in order of increasing awesomeness. All transition conditions should be "space" at this point. This stage corresponds to what filmmakers call initial assembly. Watch your demo a couple of times and try out different orders. Be prepared to spend some time hunting down missing page declarations. Study the memory chart, and see if you can make some radical changes to improve the loading times, e.g. changing the order of parts, adding some fillers, and — if it isn't too much work — moving large chunks of data around. But don't start micro-optimising at this point, and don't make any transitions yet.
Add music if you already know what SID tune you're going to use. Otherwise, let the general flow of the effects inspire your choice of soundtrack (or the process of composing one). Change all transition conditions to the "address = value" kind (or "-" where applicable), so that the music drives the overall progress of the demo. Adjust things until you are happy, and then make a conscious decision that you intend to stick with this part order and overall timing.
Now you have what filmmakers call a rough cut. Time to start working on the transitions. Begin with the big stuff, such as adding intermediate parts to e.g. make a background picture appear in anticipation of an upcoming effect. Since you know you won't change the order anymore, you can start using I tags to inherit data across parts, and try to improve loading times in general. You can also work on eliminating the blank parts inserted by Spindle. At this stage you'll probably add fadeout routines to several parts.
By now you'll probably have noticed that some of the switchovers are glitchy. Where applicable, add cleanup routines to e.g. turn off interrupts and wait for a particular rasterline before allowing the next part to run. Take care to insert extra calls to the playroutine where necessary. To avoid hardcoding the playroutine address in such situations, I suggest copying (at runtime) the operand of the ordinary jsr instruction (which will have been modified by Spindle at link time) into a jsr inside the cleanup routine. See example-pefchain/ecmplasma/effect.s.
Inevitably, you'll find yourself in an infinite loop where you watch the demo, notice some detail you wish to change, change it, then watch the demo again just to see if it still works, notice some other detail you wish to change, and so on. A pro tip is to write down the small things you notice, then fix them all in one batch before re-watching. If you are unsure about a fix, use pef2prg to watch that part in isolation.
When you are satisfied with the demo (or the deadline is getting uncomfortably close, whichever happens first), don't forget to add directory art using the -a, -t and -d options and to try it out on a real drive.
Under the hood
Spindle hides a lot of details in order to streamline the trackmo linking process, and to let the coder spend more time thinking about the actual design of the demo. But C64 coders are curious creatures (in both senses of curious), and I don't expect anyone to use a framework like this without knowing how it works internally. Spindle is open source, but here's a brief overview to get you started.
Unlike a traditional loader, Spindle does not rely on a centralised directory structure. Demo parts are chained together into a linked list of loadsets (sets of sectors), each of which contains a reference to the next loadset. A loadset does not necessarily correspond to a demo part. Pefchain splits the chunks of each demo part along page boundaries, recombines them, and schedules the resulting snippets to be loaded at various loading slots throughout the trackmo.
Between loading operations, the Spindle runtime must drive one or more demo parts by calling the various routines supplied via the .efo headers, and monitor the transition conditions. This driver code is generated by pefchain, tailored for each part, and attached to the part next to the code (that is, at the end of the .efo chunk).
All the data for a particular loading slot is compressed into a set of sectors, such that each sector can be decompressed individually. The cruncher is an optimal-path LZ packer (based on dynamic programming) that stops as soon as the crunched data fills a disk block. Every sector contains a number of independent units, each comprising a destination address, the number of "pieces" of crunched data, a bit stream and a byte stream. Because the crunched data fits in a sector, the indices into these streams are 8-bit quantities, which speeds up the decrunching. Immediately after a track boundary, blocks may also refer to data that was loaded earlier.
The loadsets are linked into a chain, by piggybacking a small (3 bytes) data structure at the beginning of one sector in each set. This information remains in the disk drive: The C64 side of the loader does not know what to load, but simply asks the drive for more data until an end-of-file condition is signalled. Each block of data is compressed and completely self-contained, with one or more destination addresses for the decruncher. In this way, both the resident part of the loader and the drivers for the individual demo parts can be very compact.
The drivecode doesn't verify the sector checksum, but transmits it along with the sector contents. The data on disk has been transformed so that the receiver must eor each incoming byte with the previous (which can be done at no cost compared to just receiving the bytes and storing them as they are). Since the final byte received is the sector checksum, the final eor operation is expected to set the zero flag. In the unlikely event that this doesn't happen, either a read error or a transmission error has occurred. The host (C64) reports the status back to the drive, and both parties act accordingly. If the checksum was correct, the host decrunches the self-contained sector into its destination address while the drive fetches another one. This parallelised loading and decrunching significantly improves performance compared to traditional loader solutions.
When the drive has successfully delivered the last block of a loadset, it signals the host that it is time to return from the loader call. Meanwhile, the drive starts loading a block from the next loadset. The drive waits until this block has been loaded before turning off the motor and waiting for the next loader call. This pipelined approach further improves performance, in particular when there are many small loadsets, and is a direct consequence of the scripted loading approach of Spindle.
Posted Tuesday 30-Jun-2015 21:48
Discuss this page
Disclaimer: I am not responsible for what people (other than myself) write in the forums. Please report any abuse, such as insults, slander, spam and illegal material, and I will take appropriate actions. Don't feed the trolls.
Jag tar inget ansvar för det som skrivs i forumet, förutom mina egna inlägg. Vänligen rapportera alla inlägg som bryter mot reglerna, så ska jag se vad jag kan göra. Som regelbrott räknas till exempel förolämpningar, förtal, spam och olagligt material. Mata inte trålarna.
Mon 13-Jul-2015 16:37
Fri 17-Jul-2015 08:08
Sat 14-Nov-2015 22:50
Best regards, Trap/Bonzai
Mon 13-Mar-2017 18:03
May I request a C16/Plus4 port, please! :)
(Bubis/RSC: dotsch@gmail.com)
Fri 6-Jul-2018 01:53
Tue 22-Jan-2019 22:28
Sat 23-Mar-2019 23:33
And... we used it again in X Marks The Spot.